
A step by step process to create your first project with Django
Summary
Django is a high-level web application frame work with loads of features in it. Actually there are endless web frameworks out there in world !! Then why Django ?
Because,
- Its written in python, which is one of easy, most readable and user friendly programming language
- The next comes the scope of its features. You don’t have to depend on external libraries if you need to build a website. It means the syntax is seamless here.
- Don’t need to worry that updating one library or framework will render others that you’ve installed useless. If you do find yourself needing to add extra features, there are a range of external libraries that you can use to enhance your site.
- One great thing is about its in-depth documentation
- There is also fantastic Django developers community, so if you get stuck there’s almost always a way forward by either checking the docs or asking the community.
Structure of Django:
A Django consist of single project which can have multiple apps in it. The concept of having multiple apps is that each can handle a self-contained function that the site needs to perform. For example, Instagram is an application which might need several functions in it to perform like user management, private messaging, image feed etc,.
Django apps are structured so that there is a separation of logic. It supports the Model-View-Controller Pattern, which is the architecture on most of the web frameworks. The basic principle is that in each application there are three separate files that handle the three main pieces of logic separately:
- Model defines the data structure. This is usually a database and is the base layer to an application.
- View displays some or all of the data to the user with HTML and CSS.
- Controller handles how the database and the view interact.
This is the basic concept on how it works. Let's use this and try to create a simple web app,
First Django Project :
Lets create a separate directory for our project and activate the virtual environment. If you are using development tools like pycharm, the venv is created by default when you are starting a new project.
Now install Django
Pip install django The latest django version will be installed. Now, Lets create our django project now,
Django-admin startproject navbar_demo,

root@Prince-PC:~/Desktop/Python_practise/navbar_demo# tree
.
├── db.sqlite3
├── manage.py
├── navbar_demo
│   ├── asgi.py
│   ├── __init__.py
│   ├── settings.py
│   ├── urls.py
│   └── wsgi.py
Here is what each file inside the project is about,
- manage.py: A command-line utility that lets you interact with this Django project in various ways. You can read all the details about manage.py in django-admin and manage.py.
- The inner navbar_demo/ directory is the actual Python package for your project. Its name is the Python package name you’ll need to use to import anything inside it (e.g. mysite.urls).
- navbar_demo/__init__.py: An empty file that tells Python that this directory should be considered a Python package. If you’re a Python beginner, read more about packages in the official Python docs.
- navbar_demo/ettings.py: Settings/configuration for this Django project. Django settings will tell you all about how settings work.
- navbar_demo/urls.py: The URL declarations for this Django project; a “table of contents” of your Django-powered site. You can read more about URLs in URL dispatcher.
- navbar_demo/asgi.py: An entry-point for ASGI-compatible web servers to serve your project. See How to deploy with ASGI for more details.
- navbar_demo/wsgi.py: An entry-point for WSGI-compatible web servers to serve your project. See How to deploy with WSGI for more details.
check your django project with the below command,
python manage.py runserver Create Django app as below,
Python manage.py startapp pages

├── pages
│   ├── admin.py
│   ├── apps.py
│   ├── __init__.py
│   ├── migrations
│   ├── models.py
│   ├── tests.py
│   └── views.py
Here is what every file inside the app is all about,
- __init__.py tells Python to treat the directory as a Python package.
- admin.py contains settings for the Django admin pages.
- apps.py contains settings for the application configuration.
- models.py contains a series of classes that Django’s ORM converts to database tables.
- tests.py contains test classes.
- views.py contains functions and classes that handle what data is displayed in the HTML templates.
After you created your Django app, we need to add the app name in the installed apps.
INSTALLED_APPS = [
'pages',
'django.contrib.admin',
'django.contrib.auth',
'django.contrib.contenttypes',
'django.contrib.sessions',
'django.contrib.messages',
'django.contrib.staticfiles',
]
Now it's time to create your views, the function that displays you what you see in the webpage
Pages/views.py ## file name
--------------
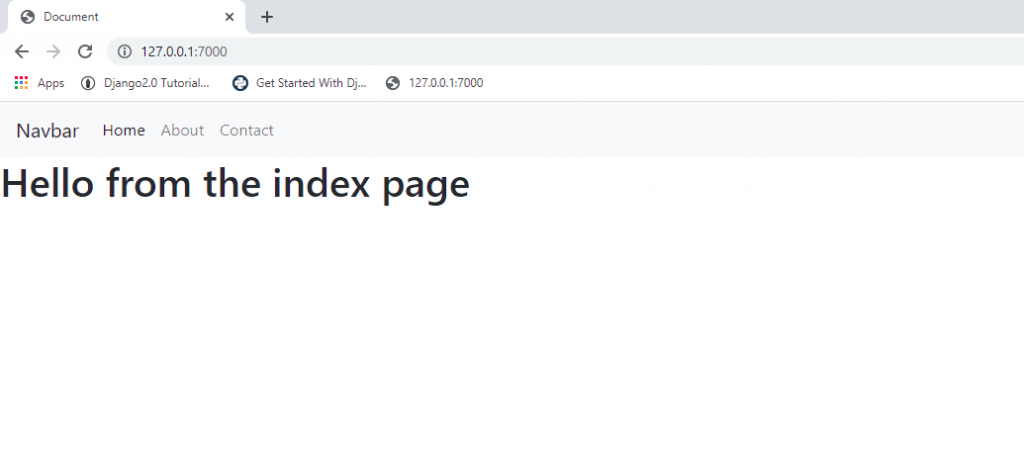
def index(request):
context = {"home_page": "active"} # new info here
return render(request, 'pages/index.html', context)
def about(request):
context = {"about_page": "active"} # new info here
return render(request, 'pages/about.html', context)
def contact(request):
context = {"contact_page": "active"} # new info here
return render(request, 'pages/contact.html', context) By default, the Django will look for the HTML templates inside each app in the project. So we are creating the templates for this project as below,
├── pages
│   ├── templates
│   │   └── pages
│   │       ├── about.html
│   │       ├── contact.html
│   │       ├── index.html
│   │       └── layouts
│   │           ├── base.html
│   │           └── navbar.html
We need to create the html file inside the templates directory as below, templates directory should be followed by the directory named same as the app and then the HTML files will be created inside it.
Each app that we are creating in Django project should be having its urls.py file and it should be linked to urls.py file of the project. Therefore here's one for our project
Pages/urls.py
--------------

from django.urls import path
from . import views

urlpatterns = [
path('', views.index, name='index'),
path('about/', views.about, name='about'),
path('contact/', views.contact, name='contact'),
]
Link the pages/urls.py file to navbar_demo/urls.py file
from django.contrib import admin
from django.urls import path, include

urlpatterns = [
path('admin/', admin.site.urls),
path('', include('pages.urls')),
]
Let's make our HTML page little attractive by adding bootstrap CDN to our code. We need to add the css files locally in the static directory. It should be created in your project directory where you will be having the manage.py file and dbsqlite3.
.
├── db.sqlite3
├── manage.py
├── navbar_demo
│   ├── asgi.py
│   ├── settings.py
│   ├── urls.py
│   └── wsgi.py
├── pages
├── static
│   └── css
│       └── bootstrap.min.css
This is because Django will check for the static files in the root directory as defined in the settings.py
# Static files (CSS, JavaScript, Images)
# https://docs.djangoproject.com/en/3.0/howto/static-files/

STATICFILES_DIRS = (
os.path.join(BASE_DIR, 'static'),
)
STATIC_ROOT = os.path.join(BASE_DIR, 'staticfiles')

STATIC_URL = '/static/'
**Note: STATICFILES_DIRS and STATIC_ROOT can be changed as per the requirement **
You can also check this by using the below like,
Python manage.py findstatus css/bootstrap.min.css
Python manage.py collectstatic
Now you have created your first django project successfully. Also given the code in git for your reference.
Here is the Github Link for the source code.
Hope this would be helpful…